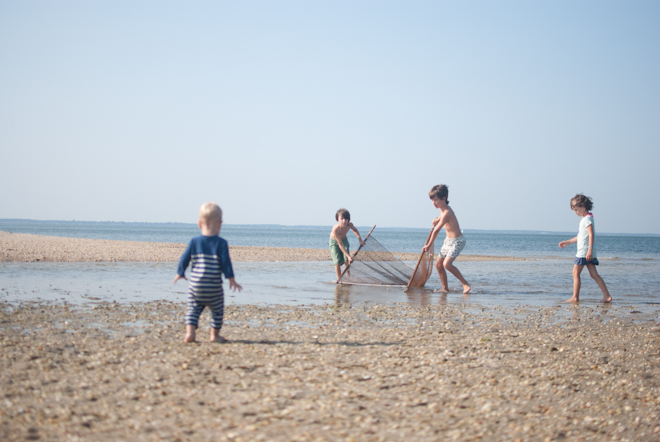
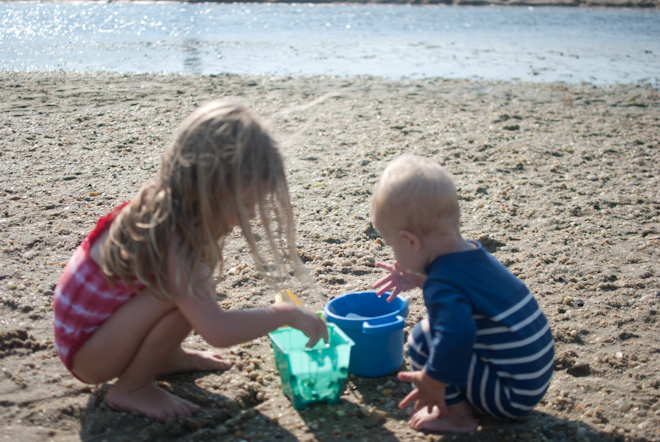
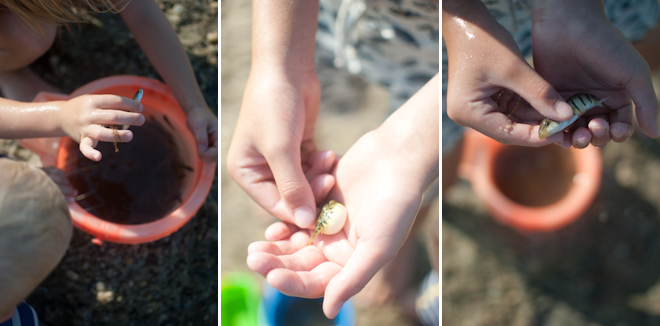
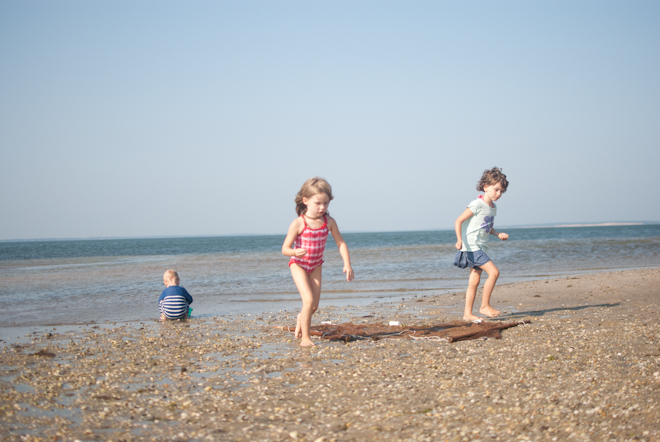
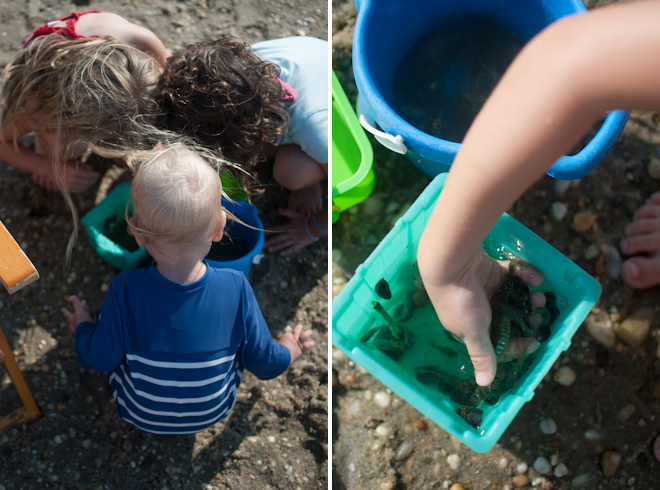
Thursday
Aug092012

chopped corn salad


When corn season is at it's peak this simple chopped salad is great. Just combine fresh corn cut from the cob, diced kirby cucumbers, diced avocado, freshly chopped cilantro, lime juice and sea salt. Delicious! 

Tuesday
Aug072012

Quinoa with aduki beans and coconut

I really like quinoa, and am always on the look out for healthy sides that do double duty if there is a vegetarian present, or if someone does not like the main dish. Aduki beans are delcious and sweet so a nice comliment to the nuty flavor of the quinoa. This dish is very simple but I like the sweet salty combination of coconut and my new favorite supermarket find: Gomasio. Gomasio is a combination of toasted unhulled sesame seeds and sea salt that is delicious sprinkled on salads. You can certainly make your own by toasting some unhulled sesame seeds and combining them with some good sea salt. The Gomasio I bought is made by Eden, an organic brand that I have often bought, but became even more interested in after reading an article recently that highlighted the differences in organic companies. FYI, the Aduki beans were also Eden.


QUINOA WITH ADUKI BEANS AND COCONUT

1 1/2 cups quinoa

1 cup shredded coconut (not sweetened)

1/4 cup gomasio (sesame seeds with sea salt)

1 can adzuki beans, drained and rinsed

1/4 cup freshly chopped cilantro

Coarse sea salt to taste

Place coconut in a baking pan and toast in a 350° oven for 3-4 minutes, until golden brown and fragrant. Set aside to cool. Cook the quinoa according to package directions. When done drain into a colander and rinse under cold water to cool. Transfer to a bowl. Add toasted coconut, gomaseo, aduki beans, and cilantro and stir. Add sea salt to taste.
Thursday
Aug022012

cindy's pea dip


Recently I visited my good friend Cindy and she made this delicious dip for us to snack on. It is basically a hummus variation using peas in place of chick peas...I loved it! It was a very hot day and she had barely thawed her peas at all -- we joked that it was like pea ice cream! I decided to give it a try with thawed peas but I think the goal is probably somewhere in between -- the coldness of the dip was particularly good but with completely frozen peas we ended up with an icy chunk that was hard to dip into. If I make it again I will partially thaw the peas but be sure to leave them quite cold. The dip is great with blue corn chips, baked potato chips, or pita chips. Cindy suggested trying it as a spread for an open faced sandwich topped with some sunflower sprouts as well...yum!


CINDY'S PEA DIP

1 10 ounce bag frozen peas, mostly thawed but still very cold

1 tablespoon tahini

Juice of half a lemon

a few fresh mint leaves

1-2 tablespoons olive oil

Sea salt to taste


Place peas, tahini, and mint in a food processor and pulse. Add lemon juice and a few pinches of sea salt and pulse again. With motor running slowly drizzle in olive oil until the desired consistency is reached. Taste and add more sea salt if needed.

Tuesday
Jul312012

miso cod

Nobu's recipe for Miso Cod has been widely published and replicated in restaurants everywhere and it is easy to see why...it is absolutely wonderful. He calls for black cod in his recipe and that is not a fish that we get very often at any of our local fish markets, so when I do see it I buy it. It has a lovely silken texture and mild flavor. Nobu's recipe calls for marinating the fish for 24-48 hours but since I found it while shopping for dinner for that evening I knew I would not be able to follow the recipe exactly...still, I wanted that sweet miso flavor so decided to give it a whirl and hope for the best. When I got home I realized we did not have any sake so that was another strike against making the original recipe. Here is the very compromised version we did make and eat that night...it was still delicious! 


MISO COD

3 tablespoons white miso paste

1/4 cup mirin

2 tablespoons sugar

2 pounds black cod


Combine miso, mirin, and sugar in a small saucepan and whisk to combine over low heat, just until the mixture is smooth. Allow to cool. Place marinade in a dish and coat fish with it. Place in refrigerator until ready to cook...I left mine for about an hour while I made the rest of our dinner.

Remove fish from marinade and place on a lightly oiled pan in a 425° oven for about 10-12 minutes, or until fish is cooked through and flaky. If the marinade has not carmelized turn oven to broil and cook for another minute or two, watching carefully, until goden brown and caramelized. Serve immediately.

Thursday
Jul262012

Inkodye 


I am so excited for my second guest blog post for the Purl Bee today! As a child I loved making sun prints, and as a mom I have bought sunprint paper many times for my kids.  So when I discovered Inkodye Light Sensitive Dyes, I couldn't wait to try them! Instead of paper, Inkodye harnesses the power of the sun to create images on fabric.  For me this is definitely an exciting development!


I knew the kids would enjoy trying Inkodye too so we set up a big table, gathered our supplies, and got ready to experiment. I cut a yard of Moda's muslin into a few sizes - I was not extremely careful in the cutting but my pieces were roughly 6x8, 10x13, and 6x18. I wanted small pieces in a variety of sizes to experiment with knowing that I might sew them back togehter again into a quilted piece of fabric. Having a lot of scraps to work with eliminated the pressure to get it "right" on the first try and kept us all loose and creative. 


We started out by testing Inkodye's colors by painting some simple stripes. It was magical to watch the very pale stripes come alive the moment we stepped out into the sun. Although it takes about 10-12 minutes for the dyes to really set you start to see the colors very quickly the moment they hit the light. I really responded to the warm red tones that we got doing this first test so I used red and orange dyes for my project. Sometimes I mixed the two together, or added a little water, to get a variety of shades.


The next step was to get printing. We knew we wanted to play with botanicals and so snipped a few blossoms, leaves, and stems from our garden. Ferns and Japanese maple leaves made particularly nice prints but we also tried hydrangea leaves, a clematis vine, and some other flowers too. I was hoping to get subtle variations in the prints by letting the plants lie naturally on the fabric but it was a breezy day and that did not result in the best prints. I recommend placing a piece of plexiglass over the assemblage to keep it all in place, since even a little movement can really blur the image. I bought a cheap frame for $1.99 at Michael's and used the plexi from that to weigh down our leaves. 


We all loved watching as each print evolved in the light, surprising us every time! For some designs I started by brushing on one color and exposing it before adding any leaves. After letting the fabric expose for 10 minutes I brushed on a second color and placed the leaves for a second 10-12 minutes of exposure. Even layering a lighter dye over a darker one gave some pretty and more subtle prints. For a few pieces I did not use any leaves but instead just experimented with brush stokes and pattern using a special comb. To get paler shades of color I diluted the dye with a little bit of water.


When we were finished dyeing, I started to think about what I could make with our fabric. I had plenty of fabric for a quilted bag and so with some Quilter's Dream Cotton Batting, I got busy. I lay a 23x46 inch peice of batting on the table and arranged the printed pieces of fabric right on top of it. I did not want an orderly pattern so I was a bit haphazzard in placing the pieces but, I did make sure that within all the randomness, I maintained 4 distinct rectangles that could be easily pieced together in the end. 


Once I had sewed the seams and the batting was securely attached I did some more quilting: stitching in the ditch of the seams and also on the spines of the larger ferns and leaves. I stitched a grid over some of the maple leaves, and in the areas where I had experimented with strokes I sewed some diagonal lines that mimic the movement of the pattern. None of this was very precise but in the end I made sure that all of the fabric was quilted in some way or another, with stitching at least every 3-4 inches.


To construct the bag you can follow the directions for Molly's fabulous 40 minute tote on the PurlBee. I used the quilted fabric I made for the outside, 3/4 yard of Shot Cotton in Watermelon for the lining, and Gutterman's thread in color 4930 to sew it. 


I trimmed the quilted fabric into a 23x34 rectangle and squared the edges so that I would have a neat piece to work with before I started sewing. I cut two 2x34 inch strips from the long sides of the rectangle to make the straps (I opted to make my own rather than use webbing like Molly did for her bag). I cut one strip off each side of my rectangle because that left the nicest design on the main piece for the bag but you can cut both off one side if you prefer. The remaining piece of quilted fabric was 19x34 inches. I cut two strips of the shot cotton measuring 2x34 and 1 piece measuring 19x34 for the bag lining. Molly's bag is not exactly the same size as mine but the instructions still apply; in her directions she calls for two pieces for the bag and another two for the lining but I just used 1 piece that was twice as long and folded it in half. 


To make the straps, pin the quilted strips and the cotton strips right sides together and sew with a 3/8 inch seam allowance leaving one small end open. I used a pencil with an eraser to turn the tubes inside out by gently tucking the sewed shut end into the tube and using the eraser end of the pencil to poke it up into the tube. Working slowly you can ease the pencil up and the scrunched up end down gradually turning the tube right side out. Once the tube is right side out you can trim off the bulky end that was sewn shut so the strap is 28 inches long. 


I sewed the side seams of my bag and lining and followed Molly's directions for sewing the corners to make the boxed bottom. She also gives clear instruction for how to assmeble the bag, straps and lining. You can see my photos of that process above. I added one additional step at the end: I sewed along the edges of the straps and down onto the bag where the straps were concealed to add one more quilting detail...you can see that in the photo on the right. 


I definitely look forward to more experimenting with these dyes. It was loads of fun and there are tons of things left to try! Maybe the next time we will try blues! I'll keep you posted...


Thursday
Jul192012

leche meringada

Our friend Bernat introduced us to this old fashioned Spanish dessert. It is delicious and refreshing without being too sweet. Milk is flavored with lemon zest, cinnamon, and a little sugar before freezing. You can freeze the mixture in an icecream machine if you have one, or like a granita: place in a dish in the freezer and stir with a fork every hour or so to make a slushy crystalized frozen treat.


LECHE MERINGADA

1 quart whole milk

1 1/2 cups of sugar

1 cinnamon stick

1 lemon peel, removed from lemon with a vegetable peeler 

4 egg whites

Ground cinnamon for garnish


Combine the milk, 1 1/4 cups sugar, cinnamon stick, and lemon peel in a pot and bring just to a simmer. Set aside for 1 hour to infuse the flavors. Strain the milk and cool in the refrigerator. 


Once the milk has cooled whisk the egg whites until frothy. Add the remaining 1/4 cup sugar and whip until the eggwhites form soft peaks when the whisk is lifted. Whisk in the aromatic milk. 


You can freeze this mixture in an ice cream machine if you have one, or in a pan in the freezer. A metal pan will work well since it is a good conductor of cold. Once the edges start to set stir with a fork every 30-60 minutes, until the mixture is thoroughly frozen. 


In Spain this is traditionally served garnished with a sprinkle of ground cinnamon or the twist of lemon peel but we served ours with fresh berries. 

Tuesday
Jul172012

inspired by our teachers: fort building with scott


I first met Scott when he was working at Bea's summer camp a few years ago. We were talking at the end of camp about plans and I found out Scott was starting his own business,  Sonic Enrichment, where he would be teaching music. I promtly signed the boys up!


Scott's approach teaching the kids music is different than most. He began with my boys when they were in second grade and after picking them up at school and having a snack together they would play music together for the remainder of the afternoon...but rather than starting with scales and traditional music lessons he uses more of an ethnomusicology approach. Each week he would bring his guitar, and often a drum, as well as some instrument from far reaching parts of the world. One week it might be the didgeridoo from Australia and the next it could be a mandolin. Now, at the end of their second year together the time spent with Scott has evolved. It still includes some exploration that changes week to week, but they boys are also learning to play Fur Elise among other things on the keyboard.


So, where does the fort building come in? One of the things that makes Scott so special is his understanding of kids. Our last lesson of the year was planned for the kids last day of school and Scott knew that the boys attention would be elsewhere. He also wanted to celebrate their year together. Rather than insisting that they focus their attention on practicing Beethoven he took them first to the park to build a fort. They had a great time and a couple of days later when we went to the park with friends for a picnic the boys could not wait to show me the fort. They took me down a path I had never been on before - in a small clearing was their creation. They talked about how there were three points that were crucial to the structure, and showed me where they found all the branches and rocks. I loved seeing how they had balanced large branches in the crotch of a tree and then woven smaller ones in creating a wall. It was clear that they not only had loads of fun but learned a few things too.


I wish that there was more time for this kind of combination play and learning for kids. After a long day at school it is just what they need. And, in this case, they still got in a little music time at the end of their lesson too. Thank you, Scott!

Saturday
Jul142012

strawberry salad


Last week it was just too hot to cook. After picking up the boys at camp one day we stopped at the Food Coop and searched for things for dinner that did not involve cooking. I was craving a salad but wanted something different than our usual greens with cucumbers and avocado. The strawberries smelled delicious so I decided on strawberries, feta, pistachios and a gorgous greens mix that was full of edible flowers and spicy micro greens. For a dressing I just drizzled it with good balsamic vinegar, extra virgin olive oil, sea salt and freshly ground pepper.


The salad was great but it clearly was not enough for dinner...we decided to get smoked trout and pickled herring (the boys had differing opinions about which one sounded better so we got both). We served both kinds of cold fish with crackers and it worked well with the salad...add to that some raita with whole wheat pita and we were all totally satisfied without turning on the stove.

Saturday
Jul142012

summer lentil salad


This salad is inspired by a delicious lunch I had recently with my frineds from Purl. I have been making my own simple lentil salad for years but it does require a lot of chopping...something not everyone enjoys. In this new version, grated veggies make the prep much quicker, and a creamy avocado dressing brings it all together. 


If you want to prepare the lentils in advance they can be cooked and stored in a container in the refrigerator for several days. Be sure to reserve teh garlic and shallots too, for use in the dressing.


SUMMER LENTIL SALAD (serves 6-8)

1 cup french lentils

2 cloves garlic, papery skins removed

1 small shallot

1 bay leaf

2 teaspoons coarse sea salt

1 pint sugar snap peas

3 persian cucumbers

1/2 jicama, peeled

4 radishes

Greens such as pea shoots, micro arugula, mesclun (or whatever tender salad greens you like)

1/4 cup freshly chopped dill

2 avocadoes

1/4 cup rice wine venegar

1/4 cup olive oil

1/4 cup water

1 lime


Combine lentils, garlic, shallot, and bay leaf in a pot with 6 cups of water. Bring to a boil. Reduce heat low and simmer 10 minutes. Stir in 1 teaspoon sea salt and taste for doneness - if they are tender drain and set aside. If the lentils are still hard check every few minutes until they are tender. Remove and discard bay leaf; reserve cooked garlic and shallot for the dressing.


Remove tough strings from the sugar snap peas (or snowpeas) and cut into bite sized pieces. Grate the cucumbers, jicama, and radishes using the largest holes on a box grater. Combine the grated vegetables, lentils, and dill in a large bowl. Cut avocados in half and add i half avocado to the jar of a blender. Add rice wine vinegar, olive oil, reserved garlic and shallot, and remaining teaspoon sea salt and puree. If the mixture is too thick add the water a little bit at a time until you reach the desired consistency.


Toss the greens with the lentil mixture and some dressing (you may not want all of it so add it a bit at a time) and toss to coat. Cut remaining 1 1/2 avocados into bite sized pieces and toss with salad. Queeze lime over salad and serve immediately.

Wednesday
Jul112012

woven felt pillow


I was delighted when Joelle and Page asked me to do a guest blog post for the Purl Bee. Every time I visit their shop, Purl Soho, I am drawn immediately to the beautiful wool felt so it was natural that I went there first for my inspiration. Not only are the colors beautiful, but it is a fantastic material to work with. Sewing is so much easier and less time consuming when you don't have to worry about finishing every edge and seam! 


Bea absolutely loves doing art and craft projects and has been very jealous this year of the weaving classes her brothers have taken. I decided a woven pillow would be a great use of the felt, and she could be my partner in the project. I bought two 18" squares of fuschia wool felt, one 18" square of bright pink felt, and a felt bundle in "spring" to make our pillow. Bea loved all the colors, and we both agreed that this would be a pretty pillow for her room.


One thing I have learned about crafting with my kids is that if I care a lot about what the finished project is going to look like I have to be pretty careful in the planning stage. I find it very beneficial to work with them one on one when I can, which is a lot less chaotic than trying to manage all three of them, and has the added benefit of special time together. In this case I did not want to waste the gorgeous felt so that meant doling out the colors carefully. While Bea was in school I did the prep work. First I used a chalk pencil to draw a 12-inch square 3 inches inside the perimeter of one of the 18-inch square pieces of fuscia felt. I measured and marked lines 1 inch apart within the 12 inch square. Leaving the outer lines in tact, I used a rotary cutter to carefully slit the felt on the remaining 10 lines. These slits created the warp for our weaving.


As I mentioned, I wanted to be careful with the color planning.  My vision for the pillow was primarily pink and white, using the lime green, yellow, and orange as accent colors. I also didn't want to waste the felt by cutting up too many extra strips! As a result, I cut the following from the felt bundle:


white: three 1" strips and seven 1/2" strips

dark pink: four 1/2" strips

light pink: three 1/2" strips

yellow: two 1" strips and one 1/2" strip

orange: three 1/2" strips

lime green: two 1/2" strips


This assortment gave plenty of strips for Bea to work with and she still had the feeling she had lots of choices. She loved carefully weaving the strips in and out and creating the pattern, and I love the end result. She was really able to do this part on her own but I sat with her and helped her tighten the strips as she worked so the weaving would not have any big gaps between the strips.


Once Bea was done weaving I pinned the strips together at the sides (see photo far left top) to secure the strips to each other. I sewed the strips to the square (alignining the left edge of my presser foot with the last slit) to secure the weaving in place (see photo left top). I also sewed across the top and bottom of the woven square, parallel to the strips, crossing the stitching at the corners to match the style of the weaving. 


Look at your weaving and see if you like it best oriented a certain way so you can decide which side is the bottom. Next cut a 6 inch strip from the 18" square of bright pink felt and pin it to the backside of the weaving along the bottom edge (photo middle left). Sew along this edge with a 3/8" seam allowance. Next pin the remaining 18" square of fuschia felt to the back of the pillow square, lining up the edges as carefully as you can. Sew around three remaining edges, leaving the bottom edge open. Place the pillow case on a cutting mat and use a rotary cutter to trim edges slightly. Stuff with pillow insert tucking corners into the flap to completely enclose the pillow.