Entries in sewing (11)

Thursday
Jul262012

Inkodye 


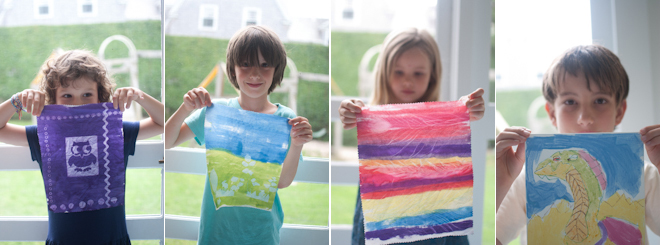
I am so excited for my second guest blog post for the Purl Bee today! As a child I loved making sun prints, and as a mom I have bought sunprint paper many times for my kids.  So when I discovered Inkodye Light Sensitive Dyes, I couldn't wait to try them! Instead of paper, Inkodye harnesses the power of the sun to create images on fabric.  For me this is definitely an exciting development!


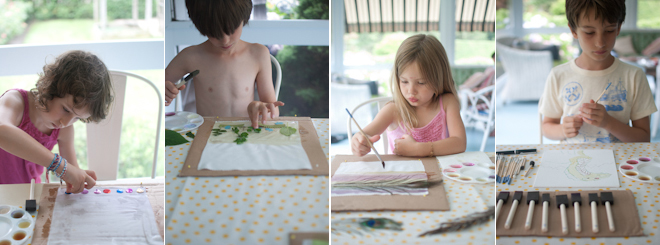
I knew the kids would enjoy trying Inkodye too so we set up a big table, gathered our supplies, and got ready to experiment. I cut a yard of Moda's muslin into a few sizes - I was not extremely careful in the cutting but my pieces were roughly 6x8, 10x13, and 6x18. I wanted small pieces in a variety of sizes to experiment with knowing that I might sew them back togehter again into a quilted piece of fabric. Having a lot of scraps to work with eliminated the pressure to get it "right" on the first try and kept us all loose and creative. 


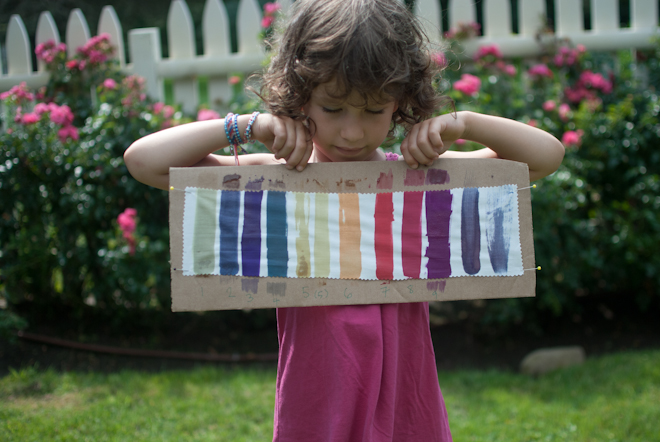
We started out by testing Inkodye's colors by painting some simple stripes. It was magical to watch the very pale stripes come alive the moment we stepped out into the sun. Although it takes about 10-12 minutes for the dyes to really set you start to see the colors very quickly the moment they hit the light. I really responded to the warm red tones that we got doing this first test so I used red and orange dyes for my project. Sometimes I mixed the two together, or added a little water, to get a variety of shades.


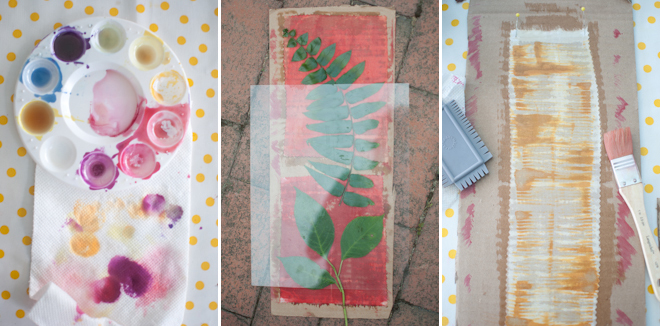
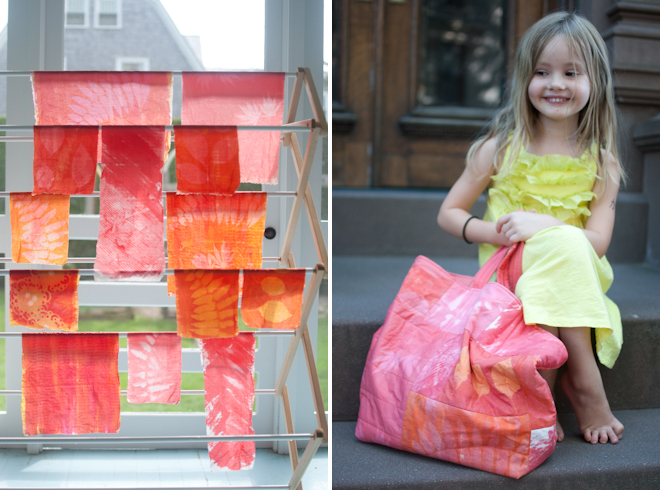
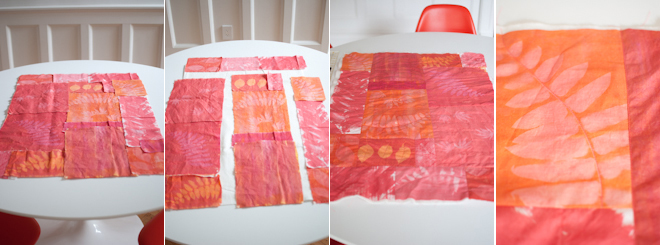
The next step was to get printing. We knew we wanted to play with botanicals and so snipped a few blossoms, leaves, and stems from our garden. Ferns and Japanese maple leaves made particularly nice prints but we also tried hydrangea leaves, a clematis vine, and some other flowers too. I was hoping to get subtle variations in the prints by letting the plants lie naturally on the fabric but it was a breezy day and that did not result in the best prints. I recommend placing a piece of plexiglass over the assemblage to keep it all in place, since even a little movement can really blur the image. I bought a cheap frame for $1.99 at Michael's and used the plexi from that to weigh down our leaves. 


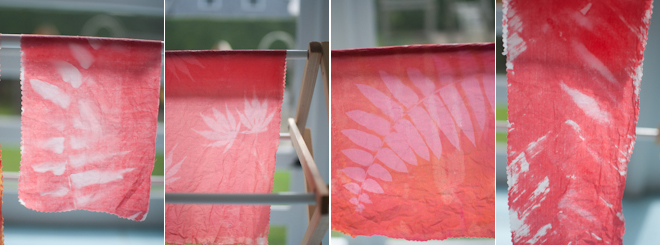
We all loved watching as each print evolved in the light, surprising us every time! For some designs I started by brushing on one color and exposing it before adding any leaves. After letting the fabric expose for 10 minutes I brushed on a second color and placed the leaves for a second 10-12 minutes of exposure. Even layering a lighter dye over a darker one gave some pretty and more subtle prints. For a few pieces I did not use any leaves but instead just experimented with brush stokes and pattern using a special comb. To get paler shades of color I diluted the dye with a little bit of water.


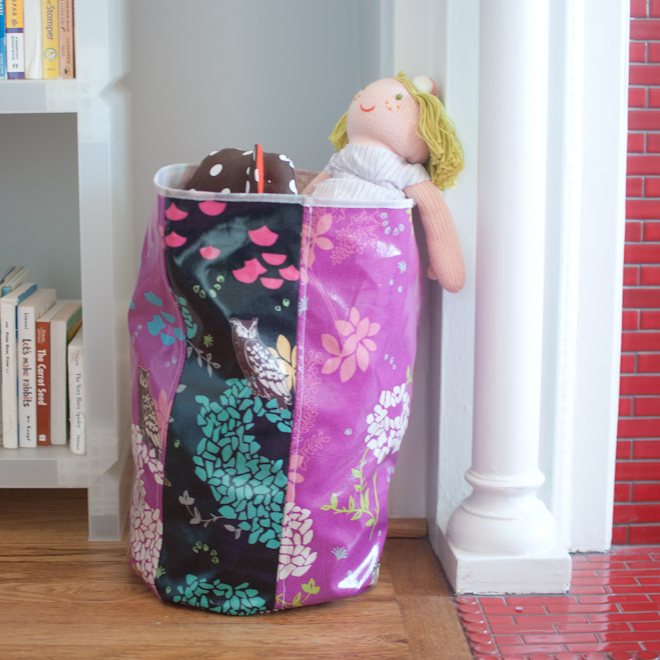
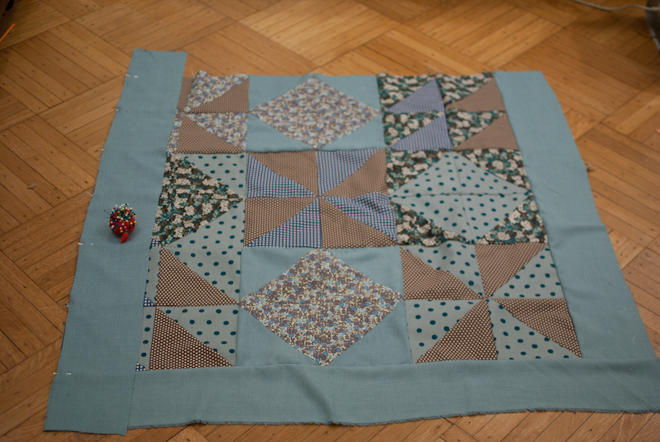
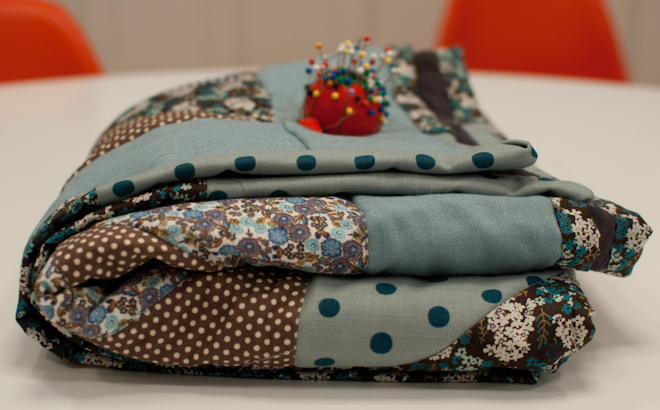
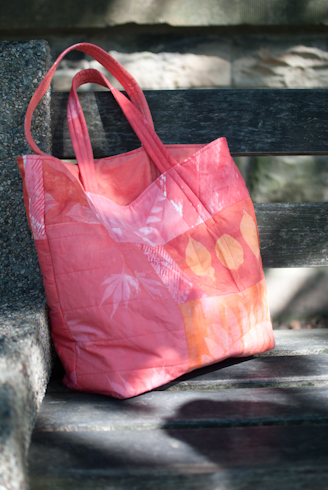
When we were finished dyeing, I started to think about what I could make with our fabric. I had plenty of fabric for a quilted bag and so with some Quilter's Dream Cotton Batting, I got busy. I lay a 23x46 inch peice of batting on the table and arranged the printed pieces of fabric right on top of it. I did not want an orderly pattern so I was a bit haphazzard in placing the pieces but, I did make sure that within all the randomness, I maintained 4 distinct rectangles that could be easily pieced together in the end. 


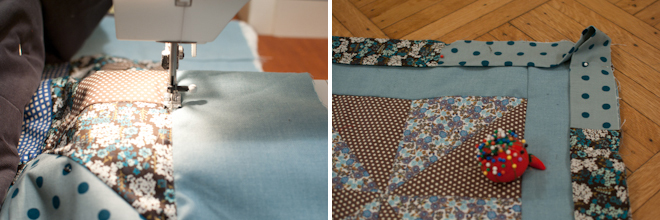
Once I had sewed the seams and the batting was securely attached I did some more quilting: stitching in the ditch of the seams and also on the spines of the larger ferns and leaves. I stitched a grid over some of the maple leaves, and in the areas where I had experimented with strokes I sewed some diagonal lines that mimic the movement of the pattern. None of this was very precise but in the end I made sure that all of the fabric was quilted in some way or another, with stitching at least every 3-4 inches.


To construct the bag you can follow the directions for Molly's fabulous 40 minute tote on the PurlBee. I used the quilted fabric I made for the outside, 3/4 yard of Shot Cotton in Watermelon for the lining, and Gutterman's thread in color 4930 to sew it. 


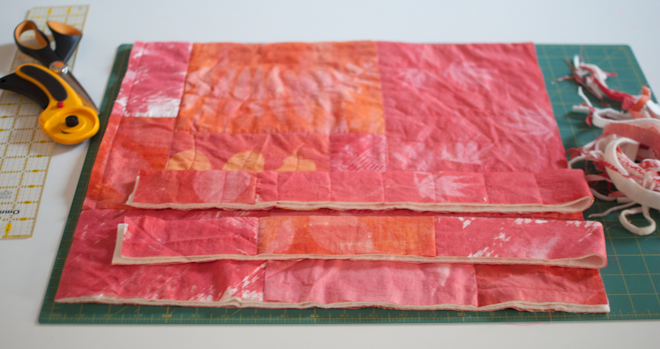
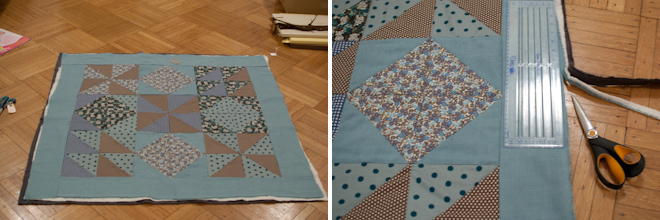
I trimmed the quilted fabric into a 23x34 rectangle and squared the edges so that I would have a neat piece to work with before I started sewing. I cut two 2x34 inch strips from the long sides of the rectangle to make the straps (I opted to make my own rather than use webbing like Molly did for her bag). I cut one strip off each side of my rectangle because that left the nicest design on the main piece for the bag but you can cut both off one side if you prefer. The remaining piece of quilted fabric was 19x34 inches. I cut two strips of the shot cotton measuring 2x34 and 1 piece measuring 19x34 for the bag lining. Molly's bag is not exactly the same size as mine but the instructions still apply; in her directions she calls for two pieces for the bag and another two for the lining but I just used 1 piece that was twice as long and folded it in half. 


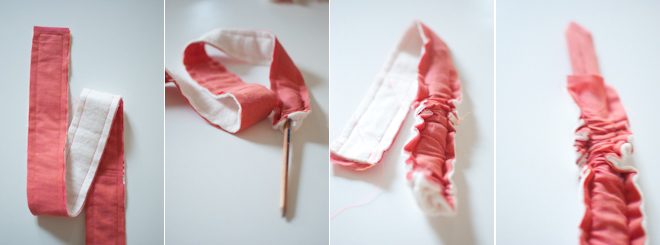
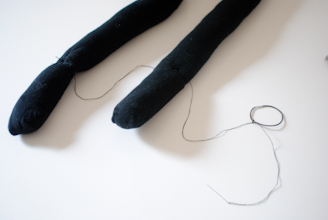
To make the straps, pin the quilted strips and the cotton strips right sides together and sew with a 3/8 inch seam allowance leaving one small end open. I used a pencil with an eraser to turn the tubes inside out by gently tucking the sewed shut end into the tube and using the eraser end of the pencil to poke it up into the tube. Working slowly you can ease the pencil up and the scrunched up end down gradually turning the tube right side out. Once the tube is right side out you can trim off the bulky end that was sewn shut so the strap is 28 inches long. 


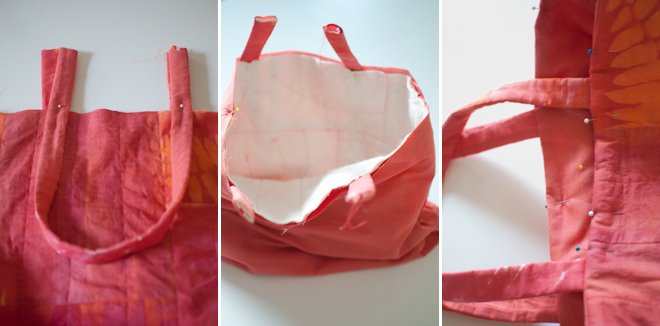
I sewed the side seams of my bag and lining and followed Molly's directions for sewing the corners to make the boxed bottom. She also gives clear instruction for how to assmeble the bag, straps and lining. You can see my photos of that process above. I added one additional step at the end: I sewed along the edges of the straps and down onto the bag where the straps were concealed to add one more quilting detail...you can see that in the photo on the right. 


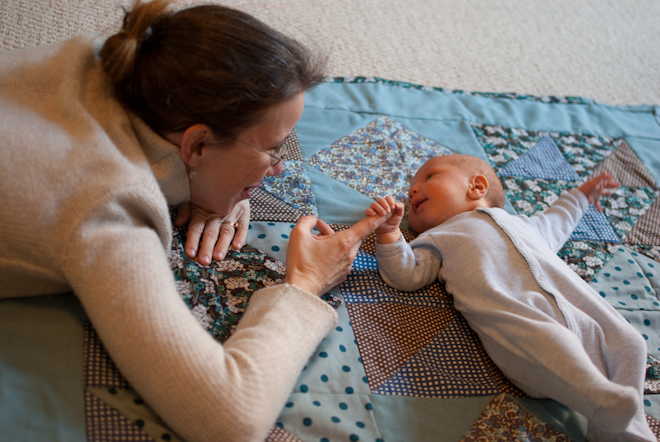
I definitely look forward to more experimenting with these dyes. It was loads of fun and there are tons of things left to try! Maybe the next time we will try blues! I'll keep you posted...


Wednesday
Nov232011

happy accident: oilcloth storage containers


Way back in June 2009 the Purl Bee posted this oilcloth bag pattern and I fell instantly in love. I immediately ordered a few yards of the oilcloth, thinking that I could make the bags as gifts. Well, for some reason, that project fell to the bottom of the list and the oilcloth has sat in its shipping tube under a table for all this time. 


Fast forward to now. One of the projects I have been working on lately is helping with the PS 321 Holiday Shop called STUFF YOU SHOULD BUY. My focus has been reaching out to all the talented people I can think of and asking them to be part of the sale. Then, at one of our planning meetings it occurred to me that there are a lot of people like me who make things, but would never think of themself as a possible vendor. I decided to put together a table of things made by parents (or friends and family) of children at the school. I am gathering donations and will donate the proceeds to the school. 


Of course, this means I need to make some stuff to contribute to the table too! As I was brainstorming I rememebered the gorgeous oilcoth bags. As I set out to make one, I was not paying close enough attention, and cut the fabric in the wrong direction. The last thing I wanted to do was waste the precious oilcloth so I had to figure out how to correct the problem. As I pieced together another strip to compensate for the mistake it changed the proportion of the bag, but somehow I loved it. I decided not to add the handles either. I love it as a storage bin for Bea's doll clothes and stuffed toys. I am not sure I will part with this one...it may have to live here. But I still have lots more oilcloth...so, more bins, and maybe some actual tote bags will be made soon!


Wednesday
Oct262011

halloween costume: ladybug


Bea's first Halloween was the year the boys opted to be a spider and a bat so in keeping with that theme she was a ladybug. We had some sheets of foam left over from a project Adam was working on which made this costume very easy. I cut two semi sircles from the foam to make the shape of the wings.  I layed out some red fabric and folded it in half, inserting a foam wing so the straight side was against the fold. Then I layed out 5 black dots on each wing, pinning the dots to the red fabric where I wanted them. I sewed on the dots first, and then repositioned the foam. I sewed around the edges of the foam, as closely as I could using my sewing machine, and then just trimmed the excess fabric off around the edges. 


I dressed Bea in a black sweatshirt and sweatpants from American Apparel (our go to base for this kind of costume) and then cut a very simple vest out of a small scrap of black fabric. I made a rectangle about the size of her back first. I then cut a second rectangle for the front and cut it in half so it opened down the middle. I used a few little strips of cloth to make shoulder straps and some smaller square side panels to connect the front and back pieces. A couple more strips at the front tied the vest closed. Once the vest was finished I sewed the wings to the back of it.


Monday
Oct102011

halloween costume: owl


Of all of the halloween costumes I have made over the years I am most proud of this one. As a matter of fact, I may wear it myself this year! Owen's obsession with Harry Potter began last year and that combined with his fascination with birds led him to want to be an owl. 


I too share a love of birds so it was a fun one to think about. I started with this sketch, and while it helped me figure out a general plan I ended up constructing it differently once I had the material in front of me. I bought a yard each of white and pale grey felt and a yard of muslin at our local craft store...their website is limited but if you call the owner can help you if you want to order supplies. I also bought some really amazing feathers in the garment district that were all sewn onto a trim. This year I found a similar white feather trim here. If you are in NYC and can go in to the store I would recommend it, but if that is not possible they will do mail order. When I talked to the sales people they said you may need to send a photo for them to match so I have included a close up of the collar I made below.


The yard of muslin became the base of the costume, and because I always end up leaving things to the last minute and am short on time I did the least possible to it. I folded the muslin, corner to corner, to form a triangle and cut a neck hole in the center, forming a very basic poncho. 


At first I had been imagining wings that spanned Owen's back and then some sort of breast plate or bib for the front.  Once I decided to cut the muslin into a poncho that made the whole thing one piece, and actually a lot simpler to make.


I made a template from a manila folder and cut feather strips from both colors of felt. Then I sewed them in alternating rows down the front and back of the poncho. In order to cover the entire muslin I needed to space out the rows considerably...this also helped prevent the costume from getting too heavy and hot. The feathers for the front and back came to a bit of a point in the center. For the wing feathers I cut the strips similarly, but eliminated the tapering shape, opting to keep them uniform length instead. (see photos above)


Once all the felt feathers were cut I divided them up to be sure that I had enough for both wings. With open spacing I managed to cover the entire muslin, placing the wing feathers perpendicular to the chest feathers (photo above left). The opening for the head was not beautiful using this technique but luckily I had found that feather trim and had not used it yet. I sewed  a piece of felt over the poky ends and added ribbon so we could tie the collar on like a necklace. It covered the top opening beautifully and added a lot of drama to the costume.


You can see in the photo (above right) that the muslin points extend beyond the wing feathers. I cut a slit in the fabric just under the feathers for Owen to poke his hands through--this helped keep the wings centered over his arms. I also sewed seams down the front on either side of the chest feathers from the bottom up, leaving a generous amount of room at the top so it would fit around the armpits. This helped keep the poncho from rotating around his body. Just be sure there is plenty of room in the costume to get in and out easily. 


For the face mask I just bought a plain white mask and Owen and I glued feathers and a felt beak to it. Worn over his eyes, or on top of his head, it added the perfect finish.

Wednesday
Oct052011

halloween costume: bunny


Felt really is my best friend at Halloween. Without any tedious hemming you can achieve a very finished looking costume. When shopping for felt be aware that there are a lot of different types -- you can find 100% acrylic felt for as little $7 a yard, and 100% wool felt (which is really gorgeous, but not necessary for a kids costume) for about $60 per yard. This costume took less than an hour to make and Bea was quite happy with it. I was too, except for the ears, which are a little too coquettish for me. 


To make this costume I had Bea lay down on a large piece of paper and I traced around her body to gauge the size. Then I cut three felt pieces: 1 in a standard tank top shape for the front, and two pieces with a curved edge seam to create the rounded back (see sketch below). NOTE: The straps in the sketch are too short...be sure to make them longer so you can adjust the size easily.


The back of the bunny did not stay rounded out on it's own so I tacked a small square throw pillow inside (photos below). The tail is a scrunchy wash ball from the drug store. Craft stores sell little squares of faux fur which we used along with some white felt for the ears. If I did this again I would be sure to set the ears apart a bit for a different look.


p.s. I intended to put a button and button hole on the straps but ended up just using safety pins instead. 

Monday
Sep262011

halloween costume: spider

I grew up wearing home made halloween costumes every year, a tradition that I am continuing with my own kids. I love the excitement of planning them together, but the hardest part is agreeing on what the costumes should be...the kids have accepted (with a little difficulty some years) that we do not buy store bought costumes, but that does not mean that they are that conscious of my costume making limitations! Every year we go through all the possibilities and brainstorm about how we would make the various ideas. I am not sure what this year will bring, but thought it might be fun to share some of the costumes we have made in past years, so will be posting lots of idea over the next month.


Although many of these costumes do require some sewing I want to emphasize that I do not do careful finishing details, or very elaboriate constructions. Many of the finished projects have raw edges that fray or look a bit sloppy, sometimes because I could not figure out how to do a better job, other times just because I am out of time. I like the fact that they are home made in a very obvious way, and I hope that as the kids get older that they will love making their own costumes, or working together with me to make them. 


This spider costume was one of the easiest to make, and it was fun to wear too since the spider legs move so well with your child's movements. I first made this spider for Oliver but the photos from that night were not very good, so Lila is modeling it here...the costume has held up pretty well I think - it about three years old and the only thing I have had to repair is the thread that suspends the legs. Coincidentally, Lila had told Lauren that she wanted to be a spider this year so now she is all set. Another benefit of this costume is that the size is very flexible so it can be worn by a variety of ages. It is a good one to keep in the dress up box or to pass on to a sibling, cousin, or friend.


We started with a simple base of a black hooded sweatshirt and pants. The kids own arms and legs count as half of the spiders legs, and then I constructed the rest from black tights. I decided to make the spider body so that it could be worn like a backpack, with legs sticking out on either side. I threaded the legs, leaving several inches of string between them, and attached a hair elastic to the top. The elastic bands can be worn like bracelets so that when your child moves their arms all the legs move with them. Oliver loved climbing our stoop and window guards in this costume, looking like a giant spider scaling a building.


I took two pairs of opaque black tights and stuffed them with stuffing, only filling the legs. There are lots of types of stuffing available at crafts stores - polyester stuffing is available at most, but if you prefer cotton or other natural fibers purl soho has a good selection on their website. I also put a few strips of craft foam in the legs to keep them a bit less floppy but I do not think this step is totally necessary.


To make the body I cut two ovals of a dark patterned fabric. Pin the legs between the two layers of fabric (wrong sides together) so that the crotch end of the tights is on the outside, and the legs are sandwiched between the fabric ovals. Sew this area on the sewing machine to secure. Repeat this step on the other side, being careful to arrange the legs so that they will all be sticking out sideways from the oval when you turn it right side out...you will need to pin them in place and then bend the legs down through the bottom of the oval. When you sew the second pair of legs continue around the oval to the other side, just leaving the opening where the legs are sticking out open.


Turn the oval inside out so that the right sides are out, and the legs are on the outside. Stuff the body of the spider with more filling and sew the opening closed, either by hand, or by machine, whichever you find easier. To make the straps I used long piece of black elastic. I folded it in half and sewed the folded end to the top of the spider body, sewing over it several times to secure it. Sew the ends to the bottom of the body in the same way.


Thread a needle with a double thickness of black thread (or for an even more durable solution a length of clear fishing line) and knot it at the bottom. The thread needs to be long enough to have the spider legs hang separately at the sides of the body. In order to make the legs stay suspended and move with your child, sew through the heel of the bottom leg, going from top to bottom a few times - this secures the thread, and it also flattens the heel creating a little bend in the leg so it looks more like a spider leg and less like the foot of your tights. Now continue through the top leg, leaving about 6-8 inches of thread between the two, repeating the stitching through the heel for this leg too. You should still have at least 12 inches of thread left on the needle. Secure this to a hair elastic by knotting it repeatedly. Repeat this whole process on the remaining legs on the other side of the spider. 


Wednesday
Jul062011

theo's pillow


When my friend Jordana had her son, Theo, I was a little stumped about what to make for him. Jordana is an excellent knitter and I knew she would whip up blankets and sweaters easily. I decided that a quilted gift was one of the few things I could make that she might not make herself.


I have quite a stash of fabric samples, swatches, and in some cases rolls, in my basement that are left over from mr.tiny. I dug through them and pulled out some favorites in a nice array of blues and got to work. When mr.tiny was still in business I spent a lot of time daydreaming about products we could develop out of the surplus fabric we had after each season was produced. If we had continued maybe this pillow would have been part of the collection.


For the most part making this pillow required only the most basic sewing, but one thing I found helpful was using a lightweight interfacing (or very thin scraps of fabric) to back the buildings before appliqueing them on to the background. For example, to make the building with the pitched roof I sewed a triangle of fabric to a rectangle of fabric to make the basic house shape. Then I sewed it to a liner with the right sides of the fabric facing together leaving the bottom open. When turned right side out all the edges are neatly folded under and all I had to do was sew it onto the background color...no tedious tucking and pinning necessary. I sewed on all the buildings first and then added the solid blue stripe at the bottom to finish it.


Wednesday
May182011

hair doll


When my niece Lila was a toddler she was obsessed with twirling her mother's hair. It drove my sister crazy enough that she finally decided to cut her hair in an attempt to break the habit. She saved a lock of her hair and I used it to make Lila a doll. I kept the hair in a ponytail and dribbled some glue around the rubber band in an attempt to keep it together. I designed this simple doll using some remnant fabric I had, and sewed the ponytail into the side seam of the head. The brown hair around the face of the doll is just brown cotton fabric. Lila never really twirled the hair on this doll but it remains a cute reminder of what she was like as a much smaller girl.

Wednesday
May042011

tassel pillowcases


The house we rented for our vacation was modern and beautiful. The bedrooms were all made up with white linens but often had one small flourish that made them very special. These tassel pillowcases were my favorite. Maybe one day I will try to make my own using this how to for making tassels.

Sunday
Mar202011

baby quilt 


Before my nephew was born, in January, I knew I wanted to make him a special gift. I decided on a small quilt -- the kind you can throw on the floor for them to play on during their first year, and then use as a crib blanket when they are old enough to have one. 


I was reading The Purl Bee and was inspired by the play of triangles in these coasters. After reading the how to I decided to go ahead and use some triangle motifs in a palette of blues and browns. Once my squares were made I had a lot of fun rearranging them into as many patterns as I could come up with. In the end I decided to go with this:


The next step was to sew all the squares together.  I decided that since some of my larger squares were a pinwheel design that my best bet was to sew the 9 larger squares next. This way I would be sure that the points in the center would all line up. 


Once these squares were sewn I rearranged them a couple more times to be sure that I had the best arrangement. Once I was sure I went ahead and sewed them together - first making 3 columns, and then sewing the columns together to make the large square.


Next I cut long strips of the solid blue fabric to make the border. Once the top is completed it is time to layer the it with a layer of batting and a square of fabric for the back. This is always my least favorite part of making a quilt since getting all the layers smooth before you pin them together is really crucial. 


Once the layers are pinned together thoroughly you sew them together -- I started by sewing from the center out towards the edges, working in all directions. This helps to prevent the layers from shifting which can result in unatractive puckering along the seams. After the layers are sewn together you need to trim the entire thing to be square (or square the sides even if the quilt is a rectangle). After trimming the edges I went back in to each square and sewed along all the seams...this is called the "stitch in the ditch" method.  


The last step is to make a binding for the quilt. My friend Joelle's book, Last-Minute Patchwork + Quilted Gifts, has a tutorial for how to make the binding that I refer to everytime I make a quilt. Many people dread this part of quilt making but I love it -- it transforms the sometimes still slightly messy looking project into a very finished peice. And there is something about that little bit of hand sewing that I really love.